 Raw Smith
Guide
Masks: edit the subject, sky, people or any part of a photo
A mask lets you edit one part of a photo. In Raw Smith, open the Masks tab, tap New Mask and choose what to select: the Subject, Sky, Background, People, a Face or an Object found for you, or a Brush, gradient or colour range you draw yourself. Then use the mask's own sliders.
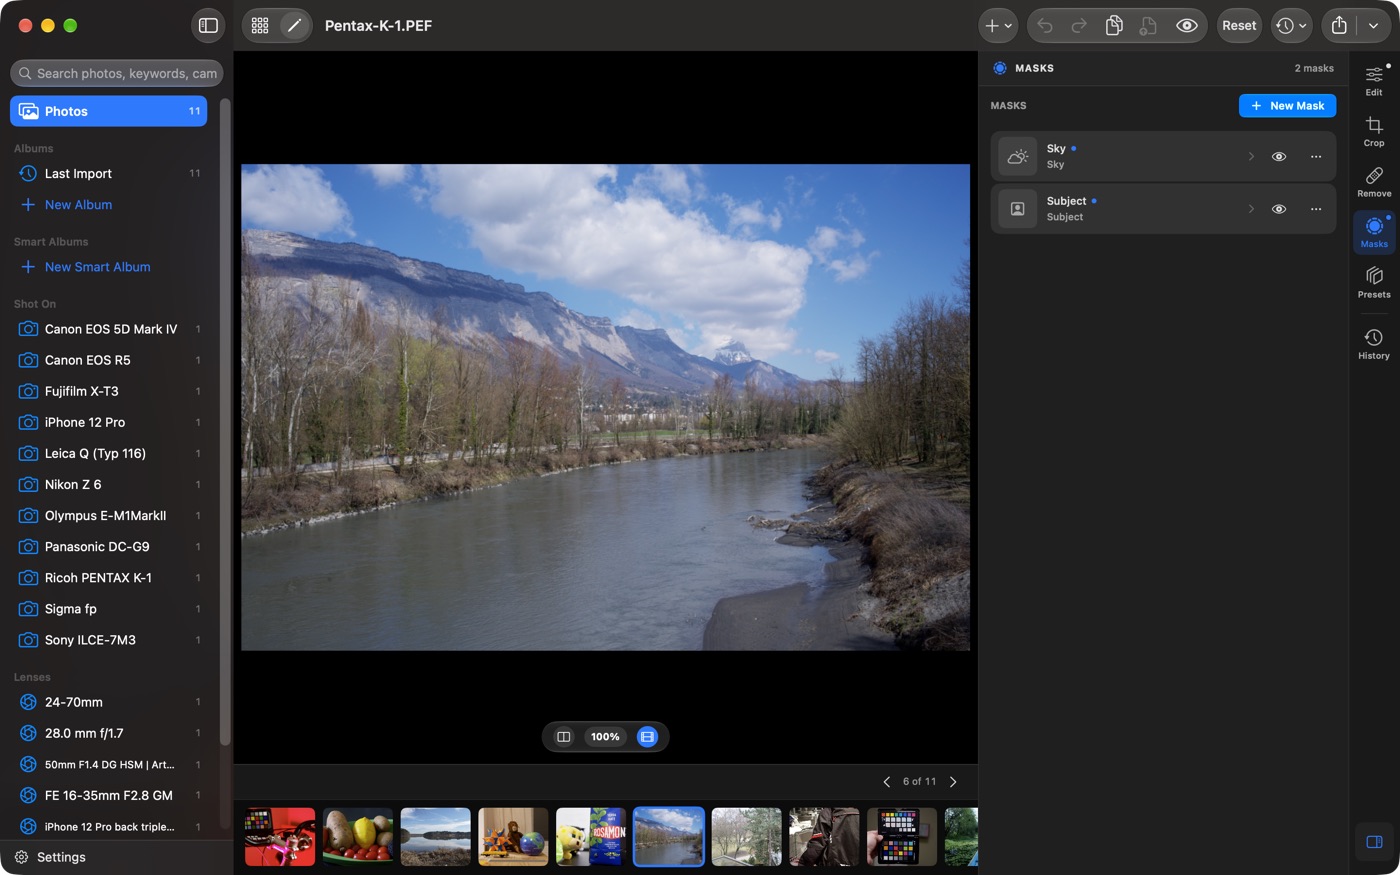
How to add a mask
- Open the Masks tab (M or ⇧W with a keyboard).
- Tap New Mask and choose a type.
- Adjust the mask's Light, Color, Effects and Detail sliders. Only the masked area changes.
Each mask has its own edits, and you can stack as many as you like.
Mask types
Found in the photo
| Subject | The main subject. |
|---|---|
| Sky | The sky. On Apple ProRAW photos it uses the sky matte the iPhone recorded. |
| Background | Everything behind the subject. |
| People | Everyone, or one person at a time when there are several. |
| Face | A face, chosen from the faces found. |
| Object | Tap a thing in the photo to select it. |
These are found with Apple's Vision framework on your device; nothing is uploaded. While Raw Smith looks, the tiles say Looking for subjects…. If a type isn't in the photo, its tile says None found in this photo.
Drawn by you
| Brush | Paint on the photo. Choose Paint or Erase and set Size, Feather and Flow. Clear Strokes starts again. |
|---|---|
| Linear | A gradient: drag its ends on the photo. Good for a sky or foreground. |
| Radial | An ellipse: drag the centre and edges, and set Feather. |
| Color | A colour range: tap a colour in the photo, then set Range. |
| Luminance | A brightness range: set Darkest, Brightest and Smoothness. |
What you can change inside a mask
An open mask has four groups of sliders:
- Light: Exposure, Contrast, Highlights, Shadows, Whites and Blacks, plus a Curve.
- Color: Temperature, Tint, Vibrance and Saturation.
- Effects: Texture, Clarity and Dehaze.
- Detail: Sharpness and Noise.
Amount scales all of the mask's edits at once, and the reset button clears them.
How to add to, subtract from or intersect a mask
A mask can be made of several parts. In an open mask:
- + adds another selection, for example a second person or a brush stroke.
- − subtracts one: take a linear gradient away from a Sky mask to keep the horizon untouched, or a brush to tidy an edge.
- ∩ intersects: keep only what both cover, such as the bright parts of the sky with a Luminance range.
Touch and hold or right-click a part's chip to change how it combines, or to remove it. Invert flips the whole mask, so a Subject mask becomes everything but the subject.
Seeing and managing masks
- Overlay shows what a mask covers in red. With a keyboard, O turns it on and off.
- On / Off, or the eye in the mask list, hides a mask's edits so you can compare.
- The ⋯ menu on each mask has Rename…, Duplicate, Invert and Delete.
Masks with Apple Pencil on iPad
Once you paint a brush mask with Apple Pencil, only the Pencil paints, so your fingers can pan and zoom without leaving marks. Pressing harder paints with more flow, and double-tapping the Pencil switches between Paint and Erase.
Masks, presets and copied edits
Found masks (subject, sky, people and so on) are found again on each photo when you paste them or apply a preset that includes them, so one sky edit can go onto a whole set. Brushed and gradient masks are copied as drawn. Choose which ones to include in Copy Settings… or when you save a preset.
For a worked example, follow the sky and subject tutorial.
Questions
How do I select the sky in a RAW photo?
Open the Masks tab, tap New Mask and choose Sky. Raw Smith finds the sky on your device; then use the mask's Light, Color, Effects and Detail sliders to edit only the sky.
Do Raw Smith's AI masks upload my photos?
No. Subject, sky, background, people, face and object masks are found with Apple's Vision framework on your iPhone, iPad or Mac. Nothing is uploaded.
How do I remove part of a mask?
Open the mask and use the − menu to subtract another selection from it, such as a brush in Erase mode or a gradient. The ∩ menu keeps only what two selections both cover.
Can I use Apple Pencil to paint masks on iPad?
Yes. Once you paint with Apple Pencil, only the Pencil paints and your fingers pan and zoom. Pressure changes the flow, and double-tapping the Pencil switches between Paint and Erase.
How do I see what a mask covers?
Turn on Overlay in the open mask, or press O with a keyboard. The area the mask covers shows in red.