 Raw Smith
Guide
Edit a RAW photo: profiles, light, colour, effects and detail
To edit a photo in Raw Smith, open it and use the Edit tab: start from a profile, then work through Light, Color, Effects, Detail and Optics. Every change is rendered from the RAW and nothing is baked in, so you can undo, compare or reset any of it.
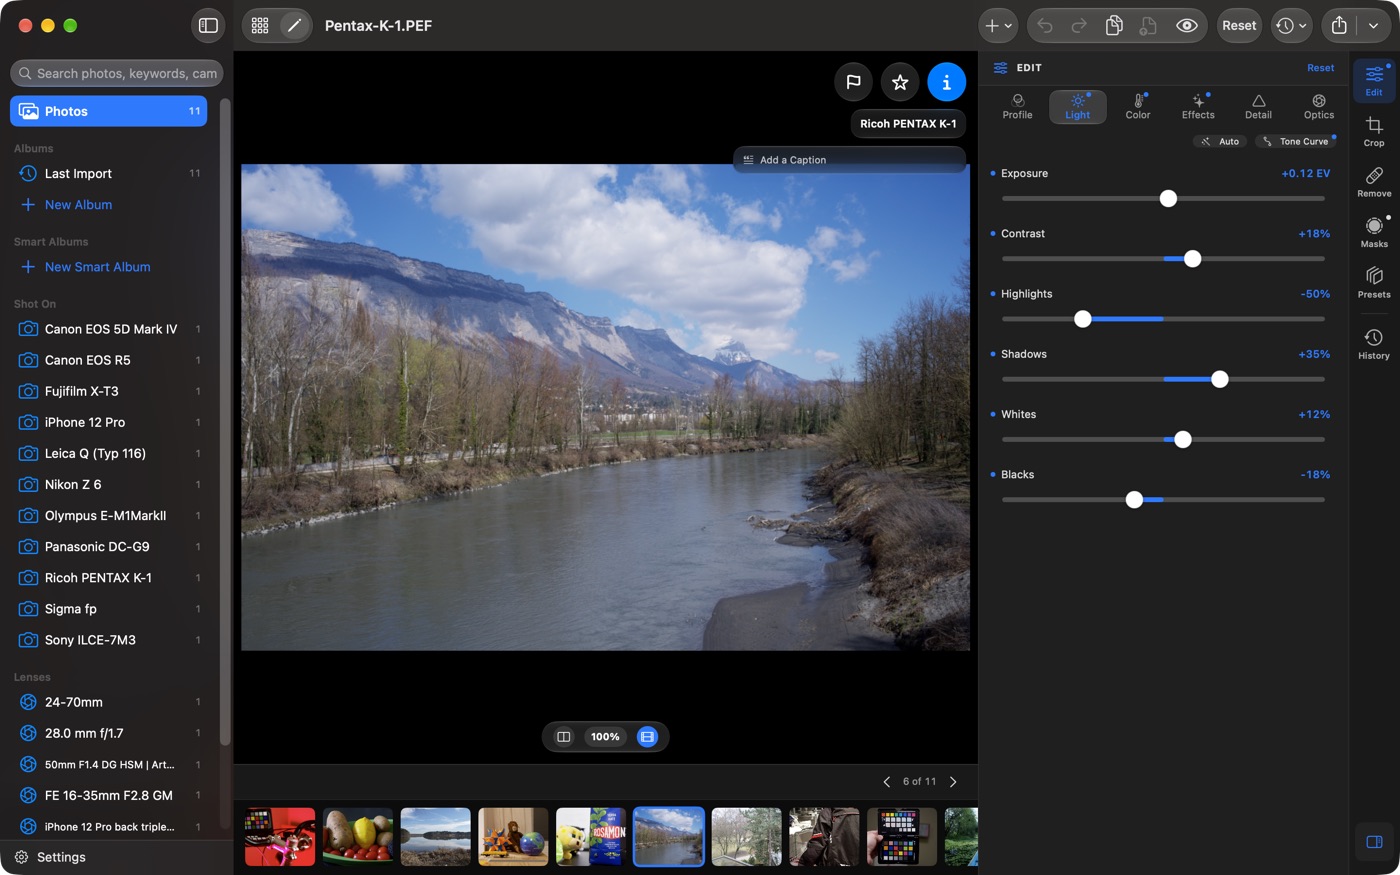
The editor on iPhone, iPad and Mac
The editor has five tabs: Edit, Crop, Remove, Masks and Presets. Inside Edit, a strip switches between the panels, and a dot marks the ones you've changed.
| iPhone | The tabs sit under the photo. Tap one to open its panel over the photo and tap it again to close it. Tap the photo to hide everything, swipe sideways for the next photo, swipe up for Info and Ratings, and swipe down to close the panel or go back to the library. |
|---|---|
| iPad and Mac | The tabs run down the right, with History below them. [ and ] go to the previous and next photo, Tab hides everything but the photo, and ⌘⌥S collapses the inspector. |
Double-tap or double-click the photo to zoom in, or use the 100% / Fit button.
Working with sliders
- Double-tap or double-click a slider's name, value or knob to reset it.
- Click the value to type an exact number.
- On iPhone and iPad, a slider floats alone over the photo while you drag it, so you can see what it does.
- On the Mac and on iPad with a keyboard, hold a key and scroll to move a slider without looking for it: E Exposure, C Contrast, H Highlights, S Shadows, W Whites, B Blacks, T Temperature, V Vibrance, A Saturation. See Speed Edit.
Profile: where a photo starts
The Profile panel shows each profile drawn on your photo. Pick one before anything else, because every other slider works on top of it.
| Standard | Balanced contrast and colour. |
|---|---|
| Neutral | Flat, for grading. |
| Vivid | More contrast and richer colour. |
| Monochrome | Black and white. |
| Apple | Apple's own camera rendering. |
Light: exposure and tone
Exposure (up to four stops either way), Contrast, Highlights, Shadows, Whites and Blacks. Auto sets Exposure, Highlights and Shadows for you as a starting point.
On iPad and Mac the panel shows a histogram. Its corner triangles turn on clipping warnings: shadows that have gone to black show in blue, highlights that have gone to white in red. J turns both on or off. iPhone has no histogram.
Tone Curve
Open Tone Curve from the Light panel. Parametric shapes the curve with four sliders, Highlights, Lights, Darks and Shadows, and three Splits that move the borders between them. Point lets you drag points on a luminance curve or on the red, green and blue curves.
Color: white balance and colour
The White Balance menu has As Shot, Auto, Daylight, Cloudy, Shade, Tungsten, Fluorescent, Flash and Custom. Temp sets it in kelvin and Tint between green and magenta. Or tap Sampler and then something in the photo that should be white or grey.
Vibrance lifts muted colours more than strong ones; Saturation lifts them all equally.
Color Mixer
Eight colour bands, Red, Orange, Yellow, Green, Aqua, Blue, Purple and Magenta, each with Hue, Saturation and Luminance. Tap a colour dot, then move its sliders. Darkening blue luminance deepens a sky; shifting orange hue changes skin tones.
Point Color
For one exact colour: tap Pick, then tap that colour in the photo. Adjust its Hue, Saturation and Luminance, and use Range to decide how many neighbouring colours come along. You can pick up to eight.
Color Grading
Colour wheels for Shadows, Mids and Highs, plus Global, each with its own luminance. 3-Way shows them together; choose one to see it large with Hue, Saturation and Luminance sliders. Blending softens the border between ranges and Balance moves it toward the shadows or highlights.
Effects
Texture brings out fine detail and Clarity mid-sized contrast. Dehaze cuts or adds haze, and Fade lifts the blacks for a softer look. Vignette darkens or lightens the corners; once it's set, Midpoint, Roundness, Feather and Highlights shape it. Grain and Grain Size add film-like grain.
Detail: sharpening and noise reduction
Sharpening and noise reduction happen while the RAW is decoded, starting from your camera's defaults. You'll see Sharpening, Noise Reduction, Color Noise, Detail, Moiré and Edge Contrast, but only the ones your camera's decoder supports. Their effect shows once the photo settles after you let go.
Where it's supported, the Enhanced switch uses Apple's machine-learning demosaic and noise reduction, which can clean up high-ISO RAWs a great deal. If a photo's original is still in iCloud, download it first.
Optics: lens corrections
Lens Corrections fixes distortion, vignetting and chromatic aberration from the lens profile your RAW carries. For colour fringes it leaves behind, use Chromatic Aberration (Red/Cyan, Blue/Yellow) and Defringe (Purple Amount, Green Amount).
How to compare before and after
- Hold: press and hold the photo to see the original, marked ORIGINAL.
- Toggle: Before in the toolbar on iPad and Mac, or \. On iPhone, Show Original in the Actions (⋯) menu.
- Split: Y shows before and after side by side with a divider you can drag. On iPad there's also a Split button in the toolbar; on the Mac use Y or the split button on the photo.
- HDR: on an HDR display, the HDR button (iPhone: Actions › HDR Preview) shows the photo with its full highlight range.
History, snapshots and virtual copies
History lists every step since you opened the photo; tap one to go back to it. Save Snapshot… keeps the edit as it is now under a name, and Restore brings it back later. On iPad and Mac, History is below the tabs (⌘6); on iPhone, touch and hold Undo and choose History and Snapshots.
To try a different version without losing this one, choose Create Virtual Copy (⌘'). The copy shares the RAW, gets its own edits and shows a COPY badge.
How to copy edits to other photos
- Copy Adjustments and Paste Adjustments (⌘C, ⌘V) copy everything except the crop.
- Copy Settings… (⇧⌘C) lets you tick which groups to copy: Profile, Light, Curves, Color, Effects, Detail, Masks, Remove and Crop. Paste Settings (⇧⌘V) pastes them.
- In the library, select photos and choose More › Copy Edits from “…” to the Others or Paste Adjustments. On the Mac, right-click › Sync Adjustments to Selected.
To reuse a look often, save it as a preset.
Resetting
Reset at the top of a panel resets just that panel. To start the whole photo again, use Reset in the toolbar on iPad and Mac, or touch and hold Undo on iPhone and choose Reset All Adjustments. A reset is a step like any other, so Undo brings the edits back.
Questions
Are edits in Raw Smith non-destructive?
Yes. Every edit is a setting rendered from the RAW, and the original file is never changed. You can step back through History, save snapshots, or reset a panel or the whole photo at any time.
How do I see the photo before and after my edits?
Press and hold the photo to see the original. On iPad and Mac the Before button toggles it, and \ does too; on iPhone it's Show Original in the Actions menu. Y shows a split view with a draggable divider.
How do I copy edits from one RAW photo to others?
Copy Adjustments and Paste Adjustments copy everything except the crop. Copy Settings… lets you choose which groups to copy, and in the library you can copy one photo's edits to every other selected photo.
What does the Enhanced switch in Detail do?
It uses Apple's machine-learning demosaic and noise reduction for the RAW. It only appears for cameras and devices that support it.
Does Raw Smith have a histogram and clipping warnings?
On iPad and Mac the Light panel shows a histogram whose corner triangles turn shadow and highlight clipping on, and J shows both. iPhone has no histogram, but J works with a keyboard.